


Spring may be just around the corner, but it will still be a while before we’ll be able to get outside and work the ground. However, getting ready for a summer garden is an activity that can be started now. Let the kids get dirty with an indoor garden! Learning to care for what they’ve germinated teaches responsibility, patience and accomplishment. It’s also a lesson in how seeds grow and change into plants that can supply their family with food.
Why inside? The benefits of starting seedlings at home go beyond a school lesson of a bean in a Styrofoam cup. Buying packages of seeds is more economical than purchasing separate plants from the store because each package holds dozens of seeds. There are also more varieties.
And growing your own plants will result in earlier harvests. There is less time maturing and more time spent growing the produce. Whether you are an expert or novice, the process is the same. In addition to attention, starting seeds will require soil (and containers), water, warmth and light.
Buy your seeds. These can be purchased practically anywhere, from grocery stores to the dollar store. They can be organic, generic or name brands like Burpee. Just be sure they’re packed for 2017. Use seeds that are large and unbroken. The last few years I’ve gone with organic seeds from Seeds of Change, and now I’ll never use anything else. The yield and quality were far better than anything I had used before. They were also less susceptible to disease and bugs.
Be aware of maturity dates. Some varieties have shorter harvest dates that are friendlier to Central New York’s climate. For different kinds of tomatoes, for example, I try to stagger when they will be ripe. This way I can enjoy them throughout the summer instead of all at once.
The Old Farmer’s Almanac also warns against starting too early. Most seed packets show zone maps of when seeds can be planted outside. Some packages advise sowing inside four to six weeks before the last frost.
Prepare your soil. Choose a light and fluffy medium that is specifically for starting seeds, says Burpee.com. Outside dirt is too dense to allow oxygen to flow. Potting soil may harbor fungi or soil-borne diseases.
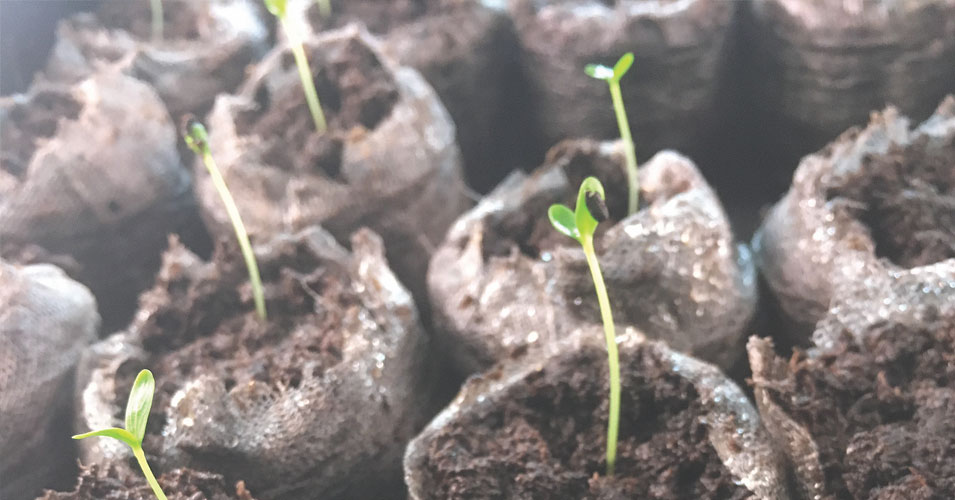
Our family friends Jerry and Sue Randall have been starting flower and vegetable seeds indoors for almost 23 years and have the process down to a science. They use peat pellets, thin discs that are kid-friendly. Just add water and watch them grow to fill out the container, ready for use. At this point, Jerry Randall says fertilizers aren’t necessary; the seed has all the nutrients it needs. Together the Randalls plant all 1,400 of their seeds one at a time. Their success rate is 95 percent!
Choose a container. Seed starting kits are large trays with several dozen small partitions called cells. They come with a bottom tray for managing water intake and a clear lid to hold humidity for the first few weeks. Some growing systems even have soil pellets included.
If using any other containers, they should be cleaned well first. Cover with a top that can be pricked with a toothpick for ventilation. Clear plastic egg cartons are an inexpensive alternative and have a lid. Cut the top off another to use as a bottom tray. Be sure to poke a hole on the side near the bottom before filling. Remember to label the container with the plant variety and date! Lots of seedlings look alike. Popsicle sticks work great for this.
Water them. In order for seeds to germinate or grow, they must never dry out. Some growing systems offer a self-watering tray. Jerry Randall agrees that bottom watering is one of the tricks to successful seedlings. Allowing the soil to absorb the water it needs prevents tiny seeds from being washed out with daily watering.
Provide warmth. Cold soil is usually the culprit when there’s no growth. Soil should be maintained between 65 and 75 degrees Fahrenheit. Heating mats are an option, and can be purchased in gardening stores or online. To save money Randall uses the tops of his freezer and refrigerator, where it’s always warm. It can hold up to four big trays, or about 50 seeds.
Shine light. Once the seedlings appear, remove the lids for good. They will now need upward of 16 hours of consistent light a day. Our spring doesn’t offer that, so putting containers by south-facing windows won’t be enough. Doing so may also be too cold for anything to grow properly.
Artificial lights or “grow lights” are needed. There are ready-made tabletop units, or check online sites to do it yourself with fluorescent lights. Fluorescents offer excellent light without “frying” the plants, as heat-emitting incandescents can do. Whichever you choose, be sure the lights can be raised to accommodate the growth of the plant. If you plan to start seeds indoors every year, consider investing in lamp timers, which will mimic the sun automatically.
Find bigger digs. Once the plants have about three true leaves, they will need to be transplanted into larger quarters with potting soil. Cottage cheese or butter containers are perfect. At this point the plants will need food about every 10 days. “In my experience,” Jerry Randall says, “any kind of potting soil works just as good as the most expensive, as long as you feed your plants. That’s the key.” Some websites suggest compost. He uses Osmacote granules.
Little kids may be tempted to touch the new leaves. Encourage it. The Farmer’s Almanac actually suggests that or a fan. The almanac says studies have proven plants that grow subjected to gentle wind are stronger than those grown in still surroundings.
Moving out. Sometime around the first of May, have the kids help move the plants back and forth outside to “harden off.” This is like daily field trips for the plants to get used to harsher conditions. Start out with a few hours in an area protected from wind but with partial sun. Gradually lengthen the time outdoors and increase plants’ exposure to full sun and spring breezes.
This is an ideal time for a science lesson on the water cycle. Between transpiration and evaporation, the plants will require more watering. Within a few weeks they can remain outside. Plants can be transferred into a garden when the chance of frost is over. For us, this is usually around Memorial Day. Some plants, like peas, can handle colder weather and can be put in earlier. Refer to the seed packets for suggested timeframes.
Our summers may seem short but by starting vegetable seeds indoors we can fast-forward to awesome harvests grown by the hands of our children.


